Showing posts with label Halloween. Show all posts

Wednesday, October 20, 2010

Trick or Treat Bag Craft

So, I'm sitting here thinking....what's next to be crafted with duct tape??

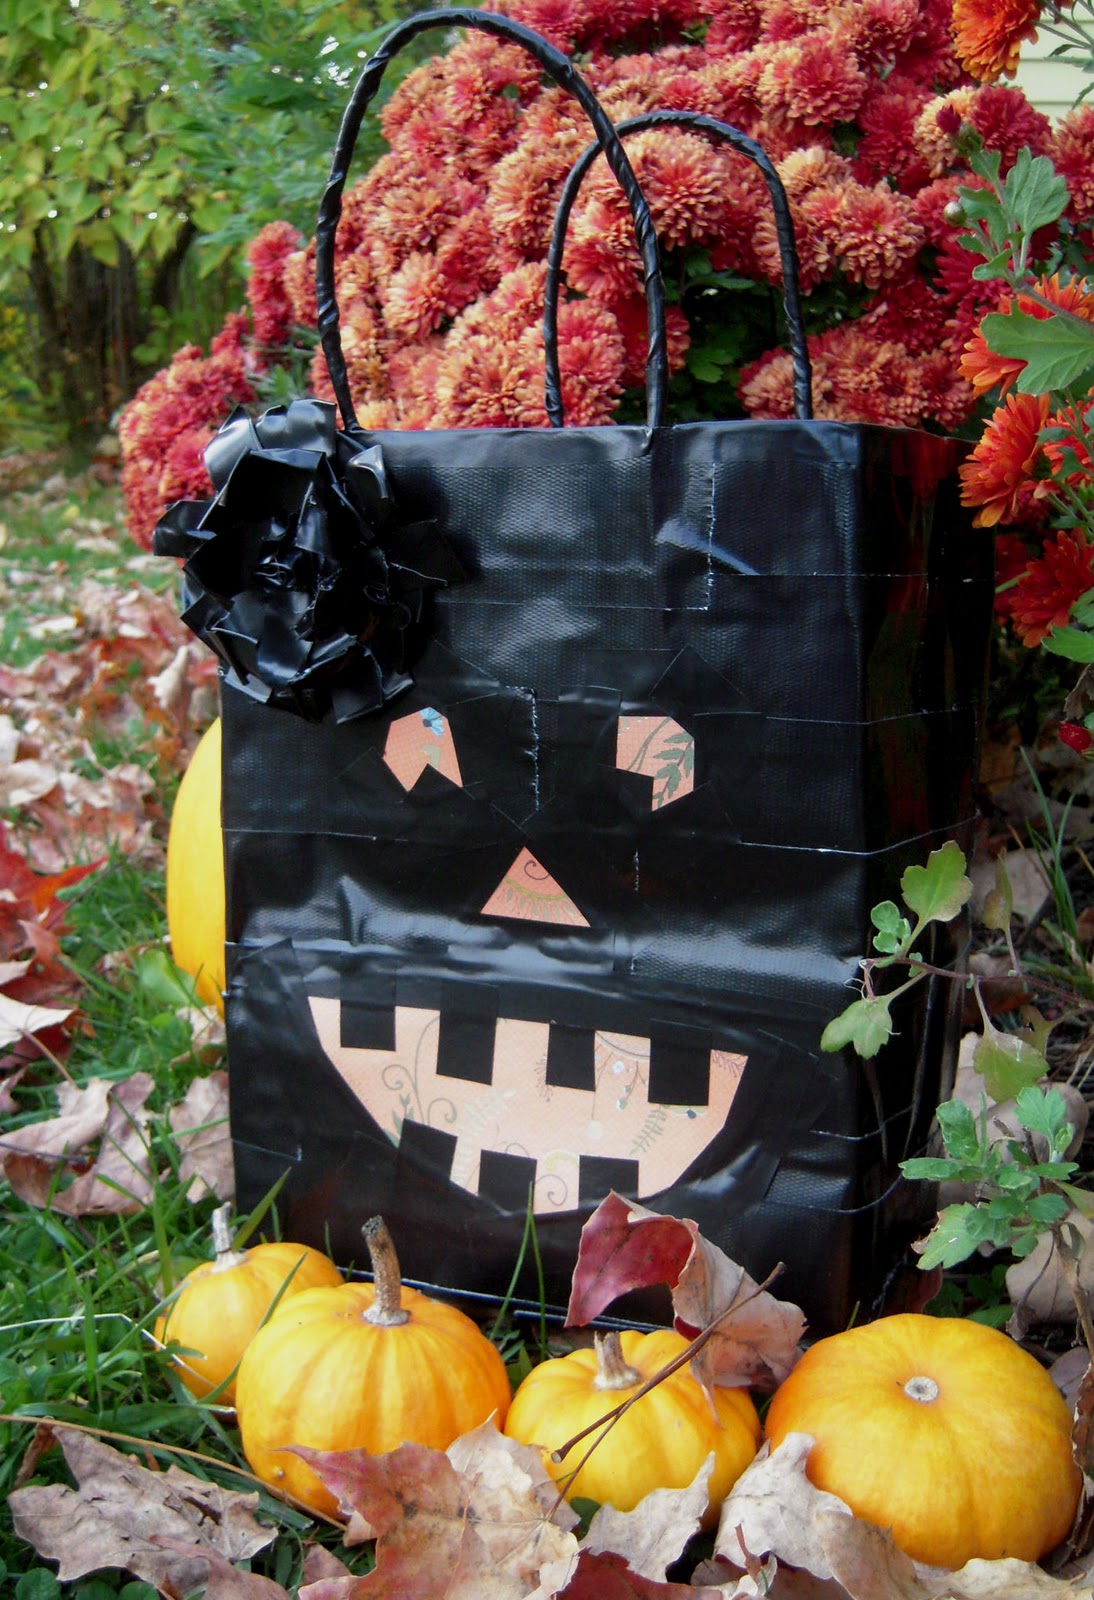
The Munchkin doesn't have a Trick or Treat bag yet. And, if she takes her candy collecting job a seriously as I did when I was a child, she'll need a bag that can handle big loads. Something heavy duty. Enter the duct tape. 


 Seriously. This stuff is addictive. 
And, the only thing that can damage it is my new puppy, Chloe. Whom, it appears, has developed a taste for it. 
Should you decide you wanna be weird like me and make this bag (perhaps you take your trick or treating seriously too)....all you need is:
Black Duct Tape
Black Electrical Tape
Gift Bag
Orange Paper
 Hot Glue
~Tape that bag right up with the Duct Tape. Cover every bit of it. I wrapped the handles in the electrical tape because it was a thinner width and easier to maneuver. I also skipped taping the entire inside, because I am not trying to make this into a boat, just a super tough bag. :-) 
~Cut out pumpkin face shapes from the orange paper and, using the electrical tape, tape it on. 
~To make the flower just cut lots of strips of the electrical tape and fold them in on themselves so that it tapes to itself. To make curly ones just press the fold piece closed when it is in a curled position and it will hold it. Use hot glue to apply all the petals.
Voila!!
Pretty weird, huh? You should have seen the Hubby's face as he watched me assemble this craft. There was a tiny amount of glowing admiration sparkling in his eye....but I think he was just so proud his wife was crafting with duct tape. Cue the Tim "the Tool man" Taylor grunt. :-)


I joined these Funky parties (check them out and cry at your ineptitude) ;-) Just kidding.


Creations by Kara


IhookedupwithHoHlamespice
giveaways


Beyond The Picket Fence

Chic on a Shoestring Decorating


Katie's Nesting Spot


Punkin Seed Productions

DIY Club
The DIY Show Off

Tuesday, October 19, 2010

Terrorific Tuesday

terrorific tuesday 2010 week 3


Use a 2-liter bottle to make a super cute Halloween cupcake dome with Pattiewack!

Glory shows you how to make Creepy Spider Biscuits with spider Halloween stencils and edible color spray!

Make a funky and functional Plaid Skull&Crossbones Skirt with Excell Crafts!

Vanessa and Erin team up to make Awesome Halloween Cookies in a Jar Crafts complete with free easy to download sticker and label printables!

Cheryl Ball shares her beautiful Embroidery Floss Acorns - the perfect fall accent.

Korinne whips up a spectacular Vintage Style Halloween Wreath on her Crafterella blog.

Make Glow in the Dark Jewelry Using Polymer Clay and Rubber Stamps with Kate at the Rubberstamping About.com page!

Learn how to make festive Pom Pom Pumpkins on the Marvelously Messy blog!

Paint a super easy Pumpkin Pin with Ann Butler to accent your fall wardrobe!

Be a hit at the costume contest with this Corpse Bride Costume by the Crafty Chica!

Alexa Westerfield a.k.a. Swelldesigner shows you how to make a Snooki Painted Pumpkin inspired by the popular Jersey Shore Guidette!

Eileen Hull shares a Cute Halloween Bookmark project that will melt your Halloween heart!

Sebastian is faster than a speeding bullet in his Superman Costume featured on the Sew DoggyStyle blog!

Phyllis Dobbs wows us with this festive Spider Apron perfect for Halloween baking!

Silvia shows you how to make a No-Sew Fuzzy Monster Cuff - the perfect craft project for all ages!

That's it for this week! If you are interested in playing in my fun Terrorific Tuesday roundup, e-mail Alexa at swelldesigner (at) gmail (dot) com and she'll send you the details!

Monday, October 18, 2010

The Halloween Scene

The Munchkin and I have been working on a Halloween Scene for our front lawn. Every year we try to have a Scarecrow theme. One year it was a young scarecrow man proposing on one knee to a young scarecrow woman (we were celebrating my Sis's recent wedding), last year we had a scarecrow witch stirring a bubbling cauldren. This year, we've got a scarecrow Munchkin and a scarecrow Mum having a gourd snack on the lawn. I even used an old highchair as a prop. I am a big fan of the red long johns the Mum is wearing, even Maine scarecrows know better than to dress fancy without our long undies on the fall. ;-)
Surrounding the happy family is their Martha Stewart originated pet black Cats (all three of them):

These Kitties have been around for a couple of years now. Inspired by the look of the kitties, I drew some large rat templates and cut out their shape in some styrofoam. With some black paint, silver glitter, tinfoil eyes and clear enamel spray....I think they should be successful in aiding our Halloween Scene.

I hope you enjoyed our decorating. We had a blast putting it all together!!!
I joined up to these funky linky Parties (Check them OUT!!!!):
Fall Festival: DIY Showoff
Three Or More Tuesdays
Frugal Friday 
Sumo Sweet Stuff
Making

All Thingz Related


Birthday Wedding cakes crafts parties


Show and Tell Green


Creations by Kara


IhookedupwithHoHlamespice
giveaways


Beyond The Picket Fence

Chic on a Shoestring Decorating


Punkin Seed Productions

Sumo Sweet Stuff

Making
All Thingz Related

Saturday, October 16, 2010

Shriveled Apple Witch Head

Ever made a shriveled apple witch head?? Kinda spooky but very easy.

This picture above is of the first step, I'll be posting more pictures as it get's closer to being finished. If I had really thought this out, I would have done this project way in advance so you could see the step by step progression. But, did I really think this out?? Nooooo. For now, do the first step and you can wait with me as we watch our heads shrink. The apple heads that is. 
~Peel an apple. Eat the peel, discard the peel, feed it to the chicken overlords....point being, you don't need the peel. 
~Cut out a slice on either side of where you want the nose to be.
~Cut out a slice for each eye. 
~Cut out a slice for the mouth.
~(Optional) Add smaller, thin, vertical slices on the cheeks and forehead that will eventually be wrinkles. 
~Spray it with lemon juice to help it stay a little less brown, should you choose. I let mine go au natural. 
Set it on a window sill in the sun where it can dry over the next week or two. What should happen is that the apple will begin to dehydrate and the wrinkles and eyes, nose, mouth will begin to form. It's a very funky looking project!!
I joined up with these spooktacular parties:

Join  us Saturdays at tatertotsandjello.com for the weekend wrap    up           party!


Funky Junk's Sat Nite Special

UndertheTableandDreaming
Making