Wednesday, June 2, 2010

Jelly Cabinet Craft


 ~Update~
You guys are right, this is NOT a Jelly Cabinet. :-) Survey says that this is a drying cabinet, hence the dowels. You can see that I never majored in vintage furniture identification (is this even vintage??.....I haven't the foggiest!!). I'm so glad I have some people to set me straight!! Thanks for the tips!!

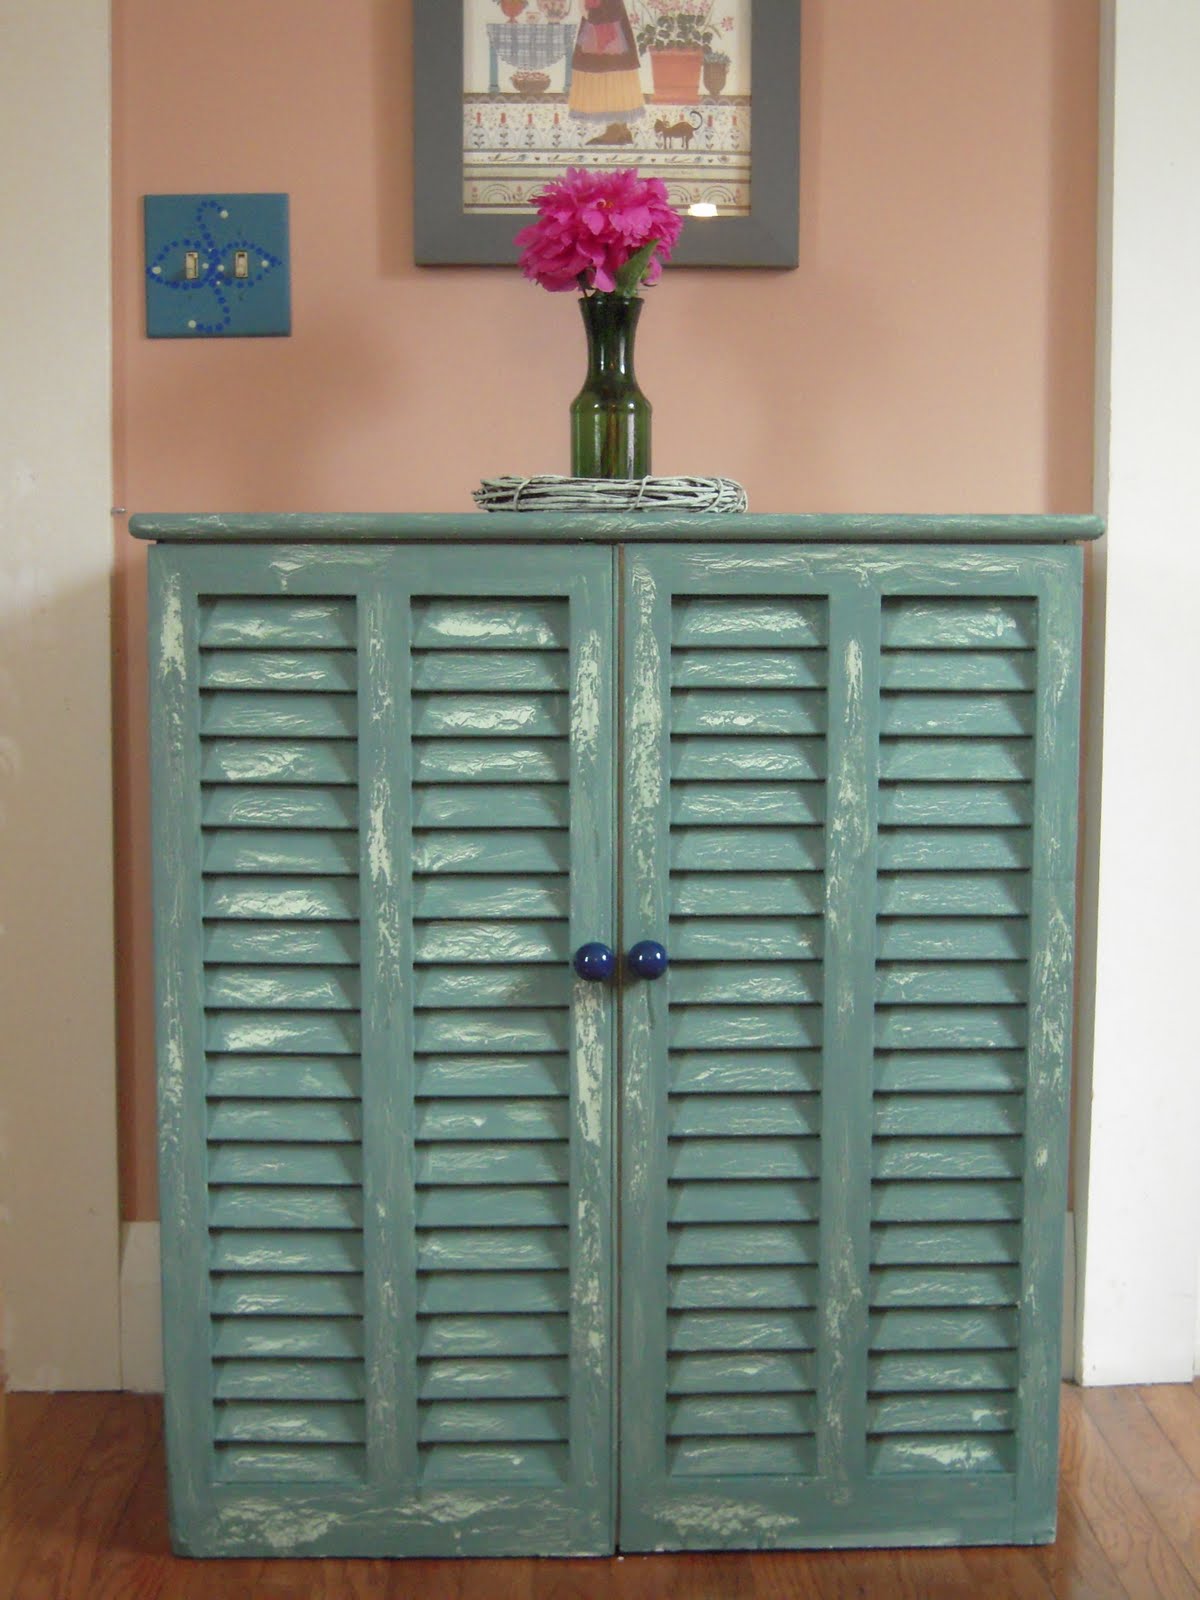
All I can say is WOOOO HOOOO!!!! I am so thrilled with the funkiness of this Jelly Cabinet redo. I found this piece last night at, you guessed it, Goodwill. For $9.99. What a deal!! Here's what it looked like when I found it:
Am I right in assuming this was a Jelly Cabinet? Let me know what you think. All these dowels threw me for a loop, but the general shape seems to suggest Jelly Cabinet. 
Here's the deal. I primed it:
Then I customed mixed a light greenish blue color for the undercoat. Once that was painted on and fully dry I slathered it with sloppy glue (thanks to some inspiration from Ann at Make the Best of Things ) waited for the glue to set a little bit and then painted over it with a darker greeish/blue. This makes for a great crackle!!

I used plain acrylic craft paint for this project. I have tried to do the crackle effect with interior paint and it is just too thick for it to work. I also painted a grape vine wreath with the undercoat color to make a little matching decor.


Whew!! I can't believe how fast that project was put together. I am so thrilled with it. I love the new splash of green in my rose colored kitchen. 


Sumo Sweet Stuff


Photobucket


Beyond The Picket Fence


Favorite%2BThings%2BFridaybig%2Bbutton.jpgMakingUndertheTableandDreamingPunkin Seed ProductionsPhotobucketGet your craft on Thurs.


Join us Saturdays at tatertotsandjello.com for the weekend wrap up party!


The Girl Creative

Sumo Sweet Stuff


Photobucket
The DIY Show Off


giveaways


Get your craft on Thurs.


Favorite%2BThings%2BFridaybig%2Bbutton.jpg


Punkin Seed Productions

Wednesday, May 26, 2010

Horse Swing


It really cracks me up how very badly I actually followed the directions on this revamped tire swing. It's not supposed to look like this. I goofed up in a plethora of ways but when I'm feeling especially thwarted I remind myself of two things:

1. Bending a rubber tire is NOT an easy task.
2. No matter what it looks like, my Munchkin adores it!!

So here are the directions I (sort of) followed and in some cases totally ignored. Bear in mind that you will absolutely need a BIAS PLY TIRE. This is a much older type of tire. The newer radial tires have metal in them that will make bending and cutting nearly impossible and the final result will be much too sharp for play. Honestly, the bending and cutting of a bias ply tire isn't easy either, but in comparison it's a breeze to the trouble a newer tire would give you. To cut the tire you are going to need a box cutter....at times I even used a jig saw (they make it sound like you're just slicing butter....this was NOT the case!!!!). I did this project entirely on my own and I've got the farm girl/tom boy jeans to pull it off.....to do it I would recommend that you are either quite strong or have a friend or two to help. I'm not tootin' my own horn here....I should have asked for help but I'm as stubborn as a goat. :-)
Here's some parties I linked up to:
Made It Monday
Thrifty Thursday 


Photobucket


The Girl Creative
Sumo Sweet Stuff


giveaways

Saturday, May 22, 2010

Found Art- Fairy Houses


Upon recommendation, my Munchkin and I rented a movie at our local library and found ourselves utterly inspired. The movie, titled  Kristin's Fairy House, is about a young girl and her Aunt (an artist looking for inspiration) who take a week-long vacation on Monhegan Island off the coast of Maine. There they discover the fairy houses built throughout the woods by children. Kristin builds her own fairy house and her Aunt is inspired by the process and writes/illustrates the story of the Fairy Houses. Kristin narrates the adventure and the movie ends with the question: "Do you believe that fairies are real?"
My munchkin always answers without any hesitation, "Yes!!" 
We took off to a secluded part of our lawn and built our fairy dwellings using only the material nature provided us: bark, twigs, grass, rocks, dirt, leaves, and flowers. This craft was so enchanting and engaging for the imagination. There is nothing like seeing a fairy world in a pile of twigs to help open your mind. 
 
The entire afternoon felt magical. Our peony tree was blooming. I could just imagine the pollen as fairy dust.
The ants were helping our peony buds by eating the sweet nectar and encouraging the leaves to open.
 
I even made some fairy people to go with the houses. I just used the twig growth and leaves from the maples that we had set our houses up against:
 We even had a visitor.


It was so amazing to me to be able to make this Found Art and know that it probably wasn't going to weather for very long. It is transitory. Of course I could probably mod podge it (*wink*)....but where is the fun in that?? Okay, there's some fun in that, but not with this. I **like** that this art will not last....and that is pretty counterintuitive to how I normally feel about my art. But no matter how long it stays, these little homes and the time my Munchkin and I spent together on them, has made a lasting impression. 
I Linked Up To These Lovely Parties:

The Girl Creative
Sumo Sweet Stuff


Get your craft on Thurs.


Beyond The Picket Fence
Join us Saturdays at tatertotsandjello.com for the weekend wrap up party!


Making

 http://linda-coastalcharm.blogspot.com/