Tuesday, May 4, 2010

Lilac Frolic

 "Fairies, arouse!!
Mix with your song 
 Harplet and pipe, 
Thrilling and clear,  
Swarm on the boughs! 
Chant in a throng!  
Morning is ripe
 Waiting to hear."

~William Allingham 

As you can see, I've made the fairies to go with my Fairy Bower!! These cuties were extra simple. Here's what you need:
  • Clothes Pin (older style, no mechanism)  
  • Small bit of Tarp
  • Extra Strength Glue
  • Bailing twine
  • Fabric paint (any color, you'll just need a dab)
  • Floral Wire
  • Acrylic Paint
  • Acrylic Clear Spray
  • White nylon
The first thing you do is take a dab of fabric paint and plop is where you want the nose to be. It takes a couple hours to dry enough so that you can paint it. It will be a little soft until the next day.  Now, take your clothes pins and paint them. I chose peach skin tones. My Munchkin chose:
A fun variety of colors!! Once painted and dry you can start adding on the face paint in whatever style you'd like. Once the whole thing is completely dry, you can shape the wire to make arms and wings. I just used one extra long piece to do both at the same time. 
Use the extra tough glue to attche the wire to the back somewhere. Then you get a length of tarp and trim some leaf shapes on one side.  Make a little hole for the wings to get through in the back.
 Attach the tarp to the torso of the fairy by threading the wings through the hole, and wrap around gluing occasionally. Use a rectangular shaped piece of white nylon, shape it to the wings you made and stitch around the edges, leaving a small hole to fit the wings through. Turn it inside out, fit it onto the wings and sew the small hole up. Then use a running stitch up and over the joining of the two wings to make them separate. Tighten and knot the thread and you're done with that part.
Use a small length of bailing twine and unravel it a bit and glue it to the top of that Fairy. It should be wild and crazy. :-)
Some Linky Parties I Joined....check them out and be inspired!!!!
Do It Yourself Day 
Talented Tuesday 
Take A Look Tuesday
DIY Project Parade 
Nifty Thrifty Tuesday
Tip Me Tuesday
Get Your Craft On Tuesday 
Metamorphosis Monday 
Made It Monday
Made By You Monday
Just Something I Whipped Up 
Making The World Cuter Monday
Works For Me Wednesday
Show Us What You're Working With
Penny Pinching Party 
Boardwalk Bragfest
Strut Your Stuff Thursday 
Get Your Craft On Thursday 
Flaunt It Friday 


giveaways


Get your craft on Thurs.


Thursday, April 29, 2010

Fiddleheadin'

The best sign of spring in my neck of the woods is the harvesting of fiddleheads from the soft, muddy banks of rivers and streams where the high water has receded. They are picked in a two week time frame usually when "the leaves are as big as a mouse's ear". I grew up harvesting fiddleheads at my family's secret spot (for the real fiddleheaders will never reveal where they pick). This year, the Munchkin got to go. She was so thrilled. The woods this time of year are so youthful and mysterious....if you tilt your head to the ground and hold your breath you can almost hear the ferns unfurling towards the sky. 

We tromped in knee high, fast moving water to reach the island while the tide was out. I carried a quietly curious Munchkin in my arms until we reached the bank. We were greeted by my father and his airdale, Harvey, who helps with the identification of fiddlehead bundles (and the snuffling of all small rodent burrows in the vicinity). Munchkin was taught to find and pick the right variety (for there are several and some can be toxic) of fern and we filled our buckets, wandering around the island for an hour. We splashed, slopped, and slipped and finally made our way across the stream and back to our car. 
 To clean fiddleheads, you need to get the brown flaky "skin" off from the outside. To do that, my father reccomends taking a sheet and laying it on the lawn and pour the fiddleheads out of the bucket and onto the sheet. As they fall the brown casing blows away in the wind. You do this a couple of times. Then, you take them inside and pop them into a pan and fill it with cold water, the brown casing will float up to the top and you can skim it off. 
To cook fiddleheads, the simplest way is to boil them in a couple of inches of water for at least 10 minutes and then drain them, add salt and pepper and some cider vinegar. Delicious!! I have also been told that they make a great quiche....try following a recipe for asparagus quiche but omit the asparagus and add the fiddleheads. They actually taste quite a bit like asparagus, though there is a deeper woodsy, nutty flavor to the fiddlehead. 
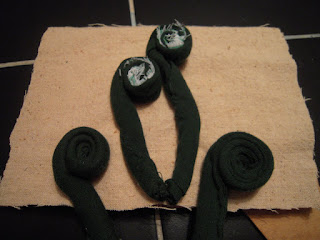
After I came back from fiddleheadin', it occured to me that the shape of the fern is actually quite a lot like the curled cloth flowers I see in so many blogs recently. So, I tried my hand at fiddlehead fronds.

Here's how you do it;
For the longer ferns you need two types of fabric, the outer stem and the inner fern (now, let us all reach deep inside ourselves and access out inner fern....oooommm............). You essentially fold the outer edges (which have been trimmed to be tapered to make it easier to curl) of the stem in and fit the ferny piece in the middle. I distressed the outer edge of my inner fern with scissors, but don't worry, its saw its counselor and is feeling much better today. ;-)
Start spiraling the whole thing up and pin it for a second while you get some matching thread and an embroidery needle and stitch it together to hold it.
 Stitch the stem you have leftover as well if you are making a longer fiddlehead.
Make some more, if you'd like. Me? I liked. 
I laid them out on a piece of fabric fit to the inset of a picture frame and used a simple stitch to attach them on.
Isn't my stitching just *marvelous*. You should see my embroidery. No, wait. Don't. :-)
Then I painted the wooden frame a nice muddy, schloppy, riverbank brown.

I waited for it to dry, fitted the fiddlehead fabric onto the picture inset and VOILA. It's the height of Fiddlehead Fashion.

I linked to these wonderful parties!!
Check them out and be inspired!!


Punkin Seed Productions

Monday, April 26, 2010

A Fairy Bower


 Fairy elves,
          Whose midnight revels, by a forest side
Or fountain, some belated peasant sees,
Or dreams he sees, while overhead the moon
Sits arbitress.
~John Milton

I spent some time the past day making some little Elf homes to adorn our herb garden and to encourage my Munchkins imagination. These were SO simple to do.
Supplies:
Large Rock (with a flat side)
Wood
Stik All Glue
Hinge and Screws
Paint
Small Hook
Thread
Wooden Knob (for lantern....or chimney too)
Clear Acrylic Spray
Tools Required:
Jig Saw
Paint Brush
Screw Driver

Take some wood and use the jig saw to make a door shape. You could do any shape you'd like: round (hobbit door-shaped), rectangle (modern), pointed (for the elf look), or triangle (just because you're weird). :-) I'm mortified to say that I used a beautiful piece of Cherry wood that I found in our barn....I thought it was just a nice piece of oak, but no. I was mistaken. Oh, boy was I EVER mistaken (according to my husband and my father). Jeesh. Well, it turned out lovely anyway. ;-)
Now it's time to sketch. Make a quick sketch with pencil (lightly) of what you'd like to paint....or, go right ahead and free-hand it with a paintbrush if you are feeling bold. 
 Paint away!! You should paint the accessories too. To give my doors a more aged look I took a wet paper towel and dipped in it some black paint and lightly sponged the entire door.

Once they're dry you can screw the hinge onto the side and bend the remaining hinge back behind the door. Then, glue the door to the rock securely. 
Almost there!! The glue will need to set for at least 24 hours. You can make the lantern by tying some black thread around the little wooden bobble and securing it to the hook (which has been glued onto the rock as well). If you would rather make a chimney, you can just dab some glue on the flat end of the bobble and stick 'er right on top of that rock. To make it more weather proof, you could coat it with some clear acrylic spray (just be sure to cover the rock behind with something so that you don't spray that too). I made two different doors just to try out some of my ideas. Here is the other door, finished with chimney:
I know I was forever imagining these kinds of dwellings when I was a child. Nature provides us with so much to encourage the imagination. I know my Munchkins reaction to this will be to fill the day with stories of the people who live in the dwelling next to the chives and sage. There will be food gathered for their lunch and a nap time announced as well. They are going to be prospering in our herb garden for sure!!!!

Check out these linky parties for some great ideas!!!!
Just Something I Whipped Up
Making the World Cuter Monday 
Made By You Monday
Made It Monday 
Market Yourself Monday 
Do It Yourself Day 
Trash To Treasure 
Talented Tuesday 
Take A Look Tuesday 
DIY Project Parade 
Nifty Thrifty Tuesday's  
Tip Me Tuesday 
Get Your Craft On 
Metamorphosis Monday 
Works For Me Wednesday
Show Us What You're Working With 
Penny Pinching Party 
Boardwalk Bragfest 
Thrify Thursday 
Strut Your Stuff Thursday
Get Your Craft On Thursday 
Flaunt It Friday
Frugalicious Friday 
Feature Yourself Friday
Plant A Punkin Seed Party 
Look At Me I'm So Crafty
Saturday Nite Special
Favorite Things Friday
Frugal Friday
Under $100 Linky Party 
Friday Favorites
It's Hodgepodge Friday 
Weekend Wrap Up Party
Sunday Showcase Party
Making The World Cuter 
Just Something I Whipped Up
Made It Monday
Market Yourself Monday 
Nifty Thrifty Tuesdays 
Get Your Craft On
Metamorphosis Monday 
Made By You Monday 
Just Something I Whipped Up 
Weekend Wrap Up Party
Saturday Nite Special  


giveaways


Get your craft on Thurs.


Punkin Seed Productions


UndertheTableandDreaming

The DIY Show Off

Its So Very Cheri
DIY Club